PHOTOSHOP
Who Are You Desktop
|
For some of you its been a while since you did any work in Photoshop, in order to refresh your memory and remind yourself of skills we will be creating an aerial view of your "desk".
You will create a aerial Desktop view of what your desk would be like if you had everything out that represents who you are. All images added to your 'desk" must have the backgrounds removed cleanly. All elements must be proportioned correctly, think about the scale of items (a iPhone shouldn't be larger than a keyboard for example). I am looking for an image that not only tells me about you, but is also laid out and designed well. Be creative about what you are adding to your 'desk." When you open Photoshop, create a new file that is 8"(w) x 4"(h) to create your desktop on. When selecting images, only use High Resolution, RGB images. As you work, save your project as a .psd and name it + first initial+lastname + desk.psd. When you are finished, save it as a PSD and a JPEG with the same name (ex: lmillerdesk.psd) and turn in both files to the classroom. Remember to add a jpeg copy to your portfolio folder! |
|
Illustrator
Geo Filter
|
You have been hired by Snap Chat to add more Geo Filters to their app for the Raleigh area. You will need to design 3 separate filters for 1 place. Be creative!! Make sure you don't inappropriate imagery or violate someone's copyright! *You can use pictures to trace from, but it shouldn't just be an exact copy of the original image. Use different parts of different pictures.
3) Save as BOTH an Illustrator file (.AI) and a .PNG file. Turn in both file types to the classroom. *** You will be graded on the complexity and creativity of your filter. If you finish significantly early, then your grade will suffer. As you work, save your project as a .ai and name it lastname + firstname + geofilter.ai. When you are finished, save it as a PNG with the same name and submit it to Mrs. Miller through the classroom. . Remember to add a jpeg copy to your portfolio! Make sure you review the rubric for this project to make sure you aren't going to lose any points! |
| ||||
InDesign
Menu
|
You have been hired as a graphic designer by The National Restaurant Association. They want you to redesign a restaurant menu for one of their businesses. You are to follow the directions given by the project manager for the target audience to complete the project. Once complete then you should review the checklist for grading criteria before turning in your work.
Design a dinner menu for a restaurant using InDesign. There are 3 tutorials to the right about setting up your project in InDesign and the basics of how to use InDesign. There is an example menu as well. You must follow the directions in the tutorial on how to set up your project before you begin, or you will have to start over. You must make sure you are working in Inches not Picas. There will be 4 total pages Page 1 - menu cover Pages 2 and 3 - graphics and layout of food items, including brief descriptions. Page 4 - Back Page Menu must include apps, salads, dinner items, and desserts. You should model this after a current food chain utlizing their logos and themes, but you are not to copy a menu from any business. You must be creative in your design and choice of fonts. NO MENUS SHOULD APPEAR ON A WHITE BACKGROUND! Save as an INDD file and as a PDF file. Submit the PDF file as last + first + menu. Save the PDF file to your Portfolio folder as well. Grading Criteria Checklist 1 - Used Internet to find high resolution images online for the project (NO blurry, pixelated, or copyright info) 2 - Saved images into Graphics folder to use in graphic editing software 3 - Menu designed in a manner that is visually pleasing, balanced, and creates an interest in the topic 4 - All images cut out cleanly in Photoshop and placed into InDesign 5 - Menu includes: appetizers, salads, entrees, desserts, and beverages 6 - Font used that is appropriate for the target audience and easy to read 7 - Menu utilizes business logo and color schemes 8 - Menu is 4 pages - cover, two inside pages, back page 9 - Graphic file is saved as a INDD file and exported as a PDF format as instructed 10 - Final graphic file is submitted as a PDF format with the instructed name for the project |
| ||||
Illustrator
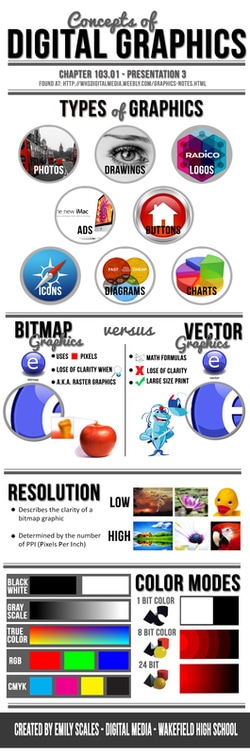
Digital Media Infographics

You will be creating an infographic for Digital Media 1 or Advanced Digital Media to be able to review the notes in a visual approximation. We remember 90% of what we learn visually, so infographics is the best of both worlds. Keep in mind that these will be used to help students learn and study the information in both classes. This means in addition to the infographic needing to be designed well, the information in your design must be correct!!! This includes spelling as well.
Before you start, you need to start with sketching your ideas out to give you a strong plan and something to reference as you are working. Don't stress if you make changes while you are creating, this is normal. See my examples and compare ---------------------------------------> Create a Illustrator file, starting with 1400 pixels wide by 4000 pixels high (you can increase or decrease the art board as needed). Must Include:
**You can Google Infographic examples to get inspiration All files need to be saved separately in a folder labeled firstname + lastname + infographic, inside this folder need to be your .AI files, your .PNG files, and any original images you used from the the internet. Remember to add a .PNG copies of all your project to your portfolio folder! BE CREATIVE! |

Sketch Example
FINAL IMAGE
|
Topics:
Digital Media Safety Issues/ Legal Issues Graphics: Elements Graphics: Principals Graphics: Tools Animation Basics Animation Procedures Audio Basics Audio Procedures Video Basics Video Procedures Video Camera Angles/ Camera Movements Web Design File Types: Graphic Animation Audio Video Web Language Get Help Here! |
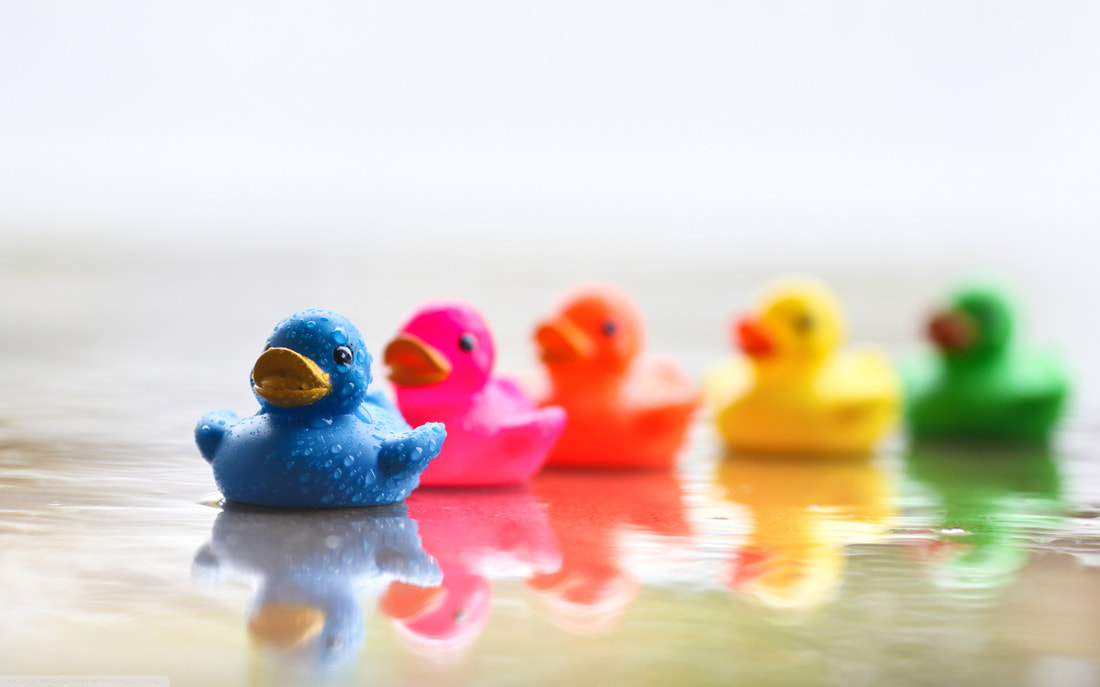
Advanced Color Effects
|
Use the How to Use Advanced Color to take the rubber duck image found here to create a collage of different versions of this image. In Photoshop you will create 9 different versions of the image with all different color effects. Then place all of these in a 1 page spread, in a 3x3 layout. You will need to save this as a .JPEG as lastname + firstname + period + AdvancedColor and put into your graphics folder on your flash drive.
|
| ||||
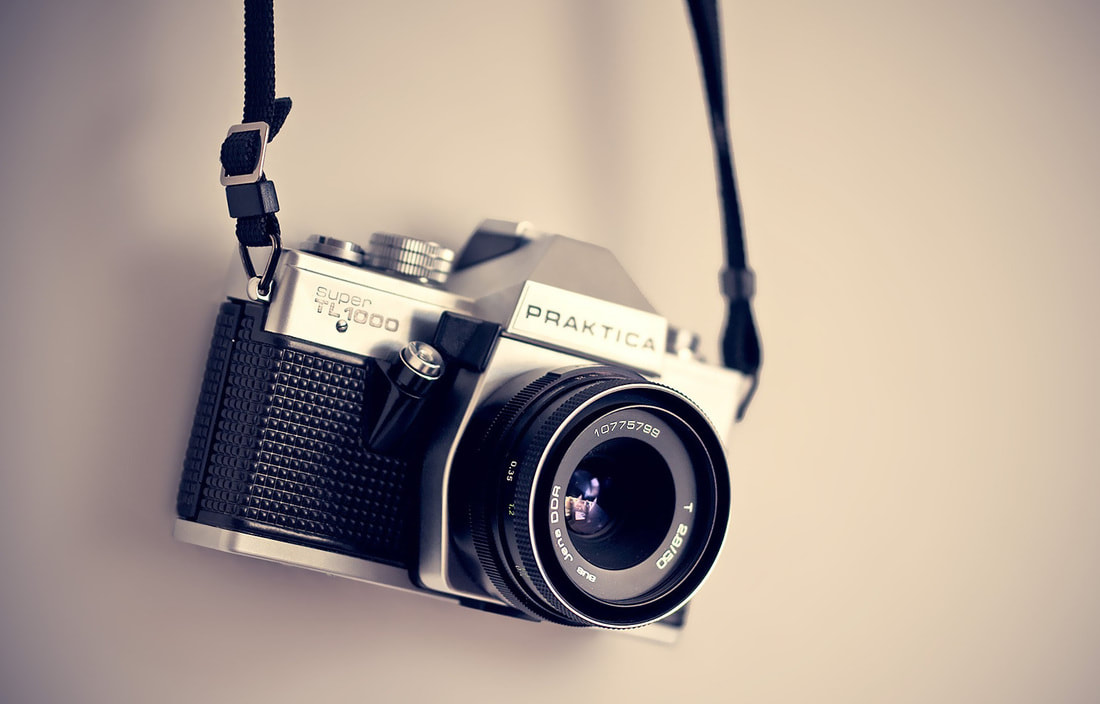
Gradient Maps
|
Use the How to Use Gradient Maps to take the camera and the images found here and apply 3 different gradient maps to the image and create a collage of different versions of this image. In Photoshop you will create 3 different versions of the image with all different custom gradients. Then place all of these in a 1 page spread. You will need to save all of these as a .JPEG as lastname+firstname+period+Gradients and put into your graphics folder on your flash drive.
|
| ||||
Duotone Effect
|
hen you will use the Make a Duotone Effect video and the file below called dutone effect.psd to adjust the picture of the girl in a fun new way. You will need to save this as a .JPEG as lastname + firstname + period + Duotone and put into your graphics folder on your flash drive.
|
| ||||||